Securing Git Commits with GPG and YubiKeys: Best Practices for 2026
On this page

This article is intended for junior or mid-level developers who want to level up their security. I've included explanations and reasoning behind decisions that most guides leave out.
But if you just want to copy and paste the full setup, jump straight to julie-ng/yubikey-setup/ on GitHub.
My Setup

Why I updated my setup
Leaving Microsoft was a good reason to do this again from scratch to keep my security skills up to date. Additional reasons included:
- I no longer needed to manage multiple identities after leaving Microsoft.
- The YubiKey is robust. Although mine is bruised and battered, it is old (from 2019) and vulnerable to EUCLEAK1.
- I got tired of looking for my house keys when I needed to commit. I wanted something to live on my computer - but still be secure (via require touch feature), and to have a backup for traveling.
Flaws in other guides
Most guides are either too basic or too paranoid. My key differences:
- NEVER put secrets inline in the shell.
Many guides input secrets straight into a command, after which your secrets live in plain text in your shell history. My article keeps secrets out of commands from the start.
Bash History is stored in plain text in .bash_history or .zsh_history. So if you followed guides that used --passphrase longsecret, PASSPHRASE=longsecret or --pinentry-mode=loopback, I'd personally consider those values compromised and re-generate keys and reset PINs.
- Touch per Operation Enabled
Each sign requires touch on the YubiKey's physical gold contact - especially important because the smaller Nano key lives plugged into my computer. - Use modern cryptography, not RSA.
Many guides default to RSA 4096. I am usinged25519, a modern elliptic curve that's just as secure and more performant than relying on prime numbers as RSA does. - Air gapping to generate your keys is overkill for a personal setup.
An air gap means you're working with a verified clean environment (i.e. ensuring against software tampering) that never touches the internet. It makes sense for a company protecting a signing key for thousands of users. For a personal key, it is overkill.
That being said, if you need an enterprise grade paranoid setup, see drduh's guide, which is basis for most guides out there, including this one.
Why Sign Commits?
Signing commits verifies who authored it. With CI/CD automation, it's straightforward for a hacker (or disgruntled colleague) to deploy bugs and even break production - as YOU.
But it wasn't you. How do you prove2 it?
Anyone can impersonate you
Pretending to be someone else is as easy as:
git config user.name "Your Name"
git config user.email "you@email.com"
You write commits locally. There is no git server authentication until you git push, which only checks if you're authorized to push. Therefore, the standard way to verify identities is via cryptographic signatures.
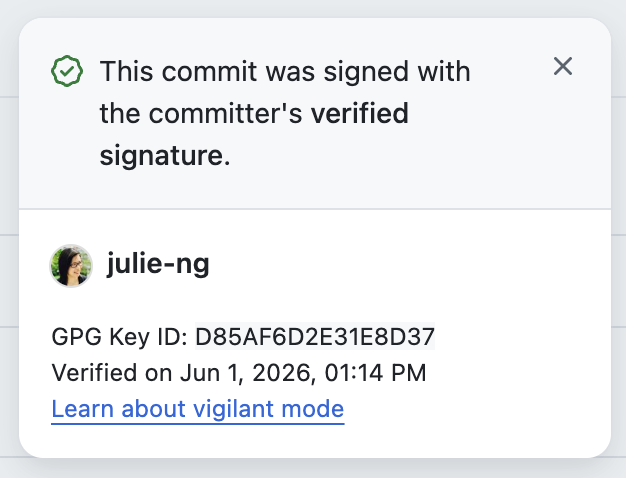
GitHub verifies your signatures and displays a green "Verified" badge on your commits.
The standard for commit signatures is a GNU Privacy Guard (GPG) signature. GPG generates and manages keys and creates signatures using a private key only you hold.
How Signatures work
Essentially through asymmetric cryptography e.g. RSA-2048 or Curve25519 you create paired cryptographic keys:
- Public Key
shared with other people and services, e.g. GitHub.com who want to verify your identity. - Private Key
used to "sign" your commit (or anything else, e.g. email). Each signature is uniquely bound to the content you are signing.
Because the two keys are cryptographically paired, as long as you keep your private key secure, it's very difficult for others to impersonate you. Be aware, it's not impossible to hack. One reason I am updating my setup is because my existing YubiKeys are vulnerable to EUCLEAK1.
Increase security with YubiKeys
Generating keys by default leaves the keys in plain text on your machine. You can increase security by moving the private key to physical hardware, e.g. a YubiKey.
Additionally, YubiKey offers a feature to require physical touch to access the keys. This really matters now that AI agents write and commit code on our behalf. In my setup, AI cannot commit on its own (which I never allowed anyway).
My offline GPG setup
GNU Privacy Guard (GPG) is the standard for signing and works seamlessly with YubiKeys. Before going through the guide, first understand what the result is.
If you successfully follow this guide, when you run
# List keys
gpg -K
you will see something like this:
# Example output
sec#  ed25519/0xABCD1234EF567890 2026-06-08 [C]
      AAAA BBBB CCCC DDDD EEEE  FFFF 0000 1111 2222 3333
uid           [ultimate] Your Name <you@example.com>
ssb>  ed25519/0x1111222233334444 2026-06-08 [S] [expires: 2028-06-07]
ssb>  ed25519/0x5555666677778888 2026-06-08 [A] [expires: 2028-06-07]
ssb>  cv25519/0x9999AAAABBBBCCCC 2026-06-08 [E] [expires: 2028-06-07]
This output shows 4 separate keys:
| Key | Key Type | Function | Algorithm | Curve |
|---|---|---|---|---|
[C] Primary Key "sec" | sec# | Certification | EdDSA | ed25519 |
[S] Subkey | ssb> | Signature | EdDSA | ed25519 |
[A] Subkey | ssb> | Authentication | EdDSA | ed25519 |
[E] Subkey | ssb> | Encryption | ECDH | cv25519 |
Two small # and > symbols indicate the keys are not on disk:
sec#: the#means the main key is offline on the USB stickssb>: the>means the subkey lives on the YubiKey
Instead, the computer has pointers to the physical hardware. The real private keys are either offline or on hardware. If someone steals my laptop, they get nothing useful.
Setup Guide (simplified)
This article is a shortened and simplified version of my guide with explanations useful for learning. If you want all details, including how to load the backup onto a 2nd YubiKey and .netrc file encryption, see full guide on GitHub.
Prerequisites
This guide assumes:
- Your USB Stick is encrypted
- You've already setup your YubiKey's name, language, etc.
- You've changed your GPG user and admin PINs, which default to
123456and12345678.
Part 1: Generate your keys
To avoid breaking your existing keyring, we will create everything in a temporary folder. Once we've confirmed everything works, we'll import the key.
Temporary GPG Home Directory
First create a throwaway temp directory (which disappears when you reboot) and point GPG to it:
# Work from temp directory
export GNUPGHOME=$(mktemp -d)
This folder disappears when you reboot.
We also want custom output formatting from drduh's guide that will show Key ID and Key Fingerprint's when listing keys.
# Copy custom output config
curl -fLO https://raw.githubusercontent.com/drduh/YubiKey-Guide/master/config/gpg.conf
Generate a Strong Passphrase
Before generating the main key, aka "Certify" key, generate a secret that will be used to create the subkeys. Without this passphrase, it will not be possible to use the primary key.
To avoid the passphrase landing bash history, write the generated string directly to a file. The example below generates a long string in XXXX-XXXX-XXXX-XXXX-XXXX-XXXX format, that's written directly to a certify-pass.txt file.
Caution - this step is where most guides use commands that have passphrase land in their shell history as plain text.
# Generate strong passphrase for primary key
LC_ALL=C tr -dc "A-Z2-9" < /dev/urandom | tr -d "IOUS5" | \
    fold -w 4 | paste -sd - - | head -c 29 > "$GNUPGHOME/certify-pass.txt"
As part of two-factor (2FA) security principle, we will keep the passphrase separate from the key backup on USB stick. So we need to read the passphrase:
less "$GNUPGHOME/certify-pass.txt"
and copy and paste the value into a password manager. We'll remove the file later. For now, we'll save the path to a variable because we need it to generate the subkeys.
PASSFILE="$GNUPGHOME/certify-pass.txt"
Generate Primary "Certify" Key
Each key has a name- and email-based "identity". Use an email associated with your GitHub account for verified signatures.
To generate the primary key, run:
# Generate Key - Replace with YOUR name and email
gpg --batch --passphrase-file $PASSFILE \
    --quick-generate-key "Your Name <you@example.com>" ed25519 cert never
Note that
certmeans this key can only certify other keys.ed25519is the cryptography choicenevermeans this key never expires--batchis needed in combination with--passphrase-fileso that the command runs without prompting us to type the passphrase
Generate Subkeys
Now we need the primary key's fingerprint to create subkeys. Because we're learning, instead of doing this programmatically, we'll read it from output.
# list keys
gpg -K

# Example output
sec  ed25519/0xABCD1234EF567890 2026-06-08 [C]
     AAAA BBBB CCCC DDDD EEEE  FFFF 0000 1111 2222 3333
- The key ID is the string after
ed25519/0xwhere0xjust indicates hexadecimal value. ID is value without the prefix. - The key fingerprint is the long string on the next line.
Now save these values for re-use later
# Save for reuse
KEY_ID="ABCD1234EF567890"
KEY_FINGERPRINT="AAAA BBBB CCCC DDDD EEEE  FFFF 0000 1111 2222 3333"
Finally we'll generate our subkeys, which we'll set to expire after 2y i.e. 2 years.
# Generate sign key with ed25519 algorithm
gpg --batch --pinentry-mode=loopback --passphrase-file "$PASSFILE" \
    --quick-add-key $KEY_FINGERPRINT ed25519 sign 2y

# Generate auth key with ed25519 algorithm
gpg --batch --pinentry-mode=loopback --passphrase-file "$PASSFILE" \
    --quick-add-key $KEY_FINGERPRINT ed25519 auth 2y

# Generate encrypt key with cv25519 algorithm (ed… algorithm cannot encrypt)
gpg --batch --pinentry-mode=loopback --passphrase-file "$PASSFILE" \
    --quick-add-key $KEY_FINGERPRINT cv25519 encrypt 2y
Note the encryption subkey needs cv25519 instead of ed25519. We're using 2 years for expiry intending to (re-)certify them in two years.
Now you can list your keys
# List keys
gpg -k

# Example output
sec   ed25519/0x... [C]
ssb   ed25519/0x... [S] [expires: ...]
ssb   ed25519/0x... [A] [expires: ...]
ssb   cv25519/0x... [E] [expires: ...]
Before moving the private keys to the YubiKey, we want to make a backup of the entire temporary GNUPG directory.
Part 2: Back up the primary key
In this part, we'll back up the primary key. Even if you don't setup a 2nd YubiKey for redundancy, follow this anyway to create a backup, from which you can generate new subkeys – and revoke old ones.
Ensure your USB stick is encrypted. If you're using a Mac like me, re-format the stick to "APFS Encrypted". The example code below uses USB-STICK for the stick's name. Replace accordingly. For example, mine is named "GPG-BACKUP".
First, export your public key. This part is safe to share:
# Export public key
gpg --armor --export $KEY_FINGERPRINT > "$KEY_ID-public-key.asc"
Then copy the whole working folder to the encrypted USB stick:
# Copy working folder to USB Stick
cp -a $GNUPGHOME /Volumes/USB-STICK/gnupg-backup
If done correctly, you should have a directory structure like this:
/Volumes/USB-STICK/
├── gnupg-backup/
│   ├── pubring.kbx
│   ├── private-keys-v1.d/   # contains certify key + subkeys
│   ├── trustdb.gpg
│   └── ...
├── keyinfo.txt              # KEYID / KEYFP (not secret)
└── <KEYID>-public-key.asc   # exported public key
That folder holds your certify key. Treat it like a master house key. Store the stick offline and somewhere separate from the YubiKeys. If you lose both the stick and your keys, you cannot make new ones.
Now you can eject the USB stick. If you have trouble, see the full guide for additional instructions.
Part 3: Move subkeys to YubiKey
This is probably the trickiest part to wrap your head around because the gpg interactive interface is confusing.
Before continuing, confirm the working directory is still the temporary directory
echo $GNUPGHOME # should be temp directory
which should still point to something like /var/folders/.../T/tmp.XXXXX. This step is important because keytocard is destructive operation that deletes the private key. We want to ensure we're deleting from the temp directory.
Understanding "Selection" Numbers
First let's enter the gpg card edit interface.
# Edit card command
gpg --edit-key $KEY_ID
Now you will see gpg> that indicates you are in edit mode.
# GPG's "Edit" interface
gpg>
after which you can type commands like list or quit.
You can practice using the interface by setting your name, language, and changing PINs per the full guide if you want to get comfortable with the interface before performing a destructive operation.
Editing gpg keys relies on selecting a key by number, for example:
# Example - De/select the signing [S] key.
gpg> key 1
The numbers are zero-indexed key order:
# List keys
gpg> list

# example output
sec  ...usage: C   # <- position 0 (primary)
ssb* ...usage: S   # <- position 1 (signing)
ssb  ...usage: A   # <- position 2 (authentication)
ssb  ...usage: E   # <- position 3 (encryption)
IMPORTANT - Note that the asterisk in ssb* indicates that the [S] signing key at position 1 is selected - after we typed key 1.
To de-select a key, type the same command, e.g. key 1 again.
Moving Subkeys
Now that you understand how the UI works, this is what you need to move the subkeys one-by-one to the YubiKey. You will also be prompted for
- Passphrase - which you have to manually type (should be cached after first time)
- Admin PIN - which is the GPG Admin PIN. YubiKeys have multiple admin pins.
# Enter edit mode
gpg --edit-key $KEY_ID
gpg>

# Type these subcommands in this order
key 1          # Select signing [S]
list           # Confirm ONLY the usage:S line shows ssb*
keytocard      # Choose slot 1 (Signature key)   <- enter Admin PIN when prompted
key 1          # ❗️Deselect [S]

key 2          # Select authentication [A]
list           # Confirm ONLY the usage:A line shows ssb*
keytocard      # Choose slot 3 (Authentication key)
key 2          # ❗️Deselect [A]

key 3          # Select encryption [E]
list           # Confirm ONLY the usage:E line shows ssb*
keytocard      # Choose slot 2 (Encryption key)
key 3          # ❗️Deselect [E]

save
quit
After typing save and quit, we can verify subkeys are moved by running gpg -K and looking for the > markers
# List Keys
gpg -K

# Example output. Look for 3 "ssb>"s
ssb>   ed25519... [S] [expires: ...]
ssb>   ed25519... [A] [expires: ...]
ssb>   cv25519... [E] [expires: ...]
Import and Trust Keys
Currently the keys only exist isolated in a temp directory, which disappears on reboot. Now we need to import them into our user's keyring at ~/.gnupg by running:
# Import public key
gpg --import "$GNUPGHOME/$KEY_ID-public-key.asc"
And now we need to trust the key:
# Now trust the public key
gpg --edit-key $KEY_ID
gpg>
# trust
# 5
# y
# quit
So now that gpg trusts the public key, we need it to create stubs to the private keys on the YubiKey. To do that, plug in the YubiKey and run
# Generate stubs/pointers to YubiKey
gpg --card-status
Now do a final confirmation the keys exist on your user keyring ~/.gnupg instead of temp directory
unset GNUPGHOME # IMPORTANT - switch to our user keyring
gpg --list-secret-keys
The explicit list secret keys command will show an output like this
ssb>  ed25519/0x1111222233334444 2026-06-08 [E] [expires: 2028-06-07]
      Key fingerprint = AAAA BBBB CCCC DDDD EEEE  FFFF 0000 1111 2222 3333
      Card serial no. = 0006 12345678
which will also explicitly list your YubiKey's ID as the (smart) Card serial number.
To see your YubiKey's serial number, run
# Show YubiKey info
ykman info

# Example output
Device type: YubiKey 5C Nano
Serial number: 12345678 # compare with serial no. from `gpg`
Firmware version: 5.7.4
Form factor: Nano (USB-C)
Enabled USB interfaces: OTP, FIDO, CCID
Part 4: Configure git to sign commits
Configure pinentry
Finally set GPG_TTY so pinentry can prompt in the correct terminal session, by saving this line to .bashrc or your preferred config.
# .bashrc or .zshrc
export GPG_TTY=$(tty)
Configure git
Since I no longer need to manage multiple identities (work vs personal), I can use the same identity globally --global, which is most people's use case. Replace the email below with the email you used when generating the keys.
git config --global user.signingkey "$KEY_ID"
git config --global commit.gpgsign true
git config --global user.email "foo@bar.com" # your email must match identity
Now follow the official GitHub docs on Adding a GPG key to your GitHub account. Otherwise you will see "unverified" for your commits.
Now write and push a test commit to see the results:
git commit --allow-empty -m "testing git commit signature"
git push
You will be prompted to enter your PIN before writing the commit. By default, the entry prompt looks something like this:
┌─────────────────────────────────────────────┐
│ Please unlock the card                      │
│                                             │
│ Number: 12 345 678                          │
│ Holder: Your Name                           │
│                                             │
│ PIN ______________________________________  │
│                                             │
│        <OK>               <Cancel>          │
└─────────────────────────────────────────────┘
Now, if you've added public key to your GitHub profile, you should see the green "verified" badge on GitHub.
Next Steps
Now you are done wtih the foundation. Your keys exist, they use modern crypto, and your main key is safely offline and your subkeys now live on the YubiKey.
Enable Require Touch
For this simplified guide, I'll also include enabling YubiKey's require physical touch (on the gold contact) feature. Run these 3 commands below to enable touch for signing, authentication and decryption. Default value is off. Because on is annoying, I set them to cached values.
ykman openpgp keys set-touch sig cached   # signing: frequent → cached (one tap per burst)
ykman openpgp keys set-touch aut cached   # SSH auth: occasional → cached
ykman openpgp keys set-touch dec cached   # decryption: frequent (.netrc) → cached
Now you can tap the small gold contact on the YubiKey, for example on the 5C Nano:
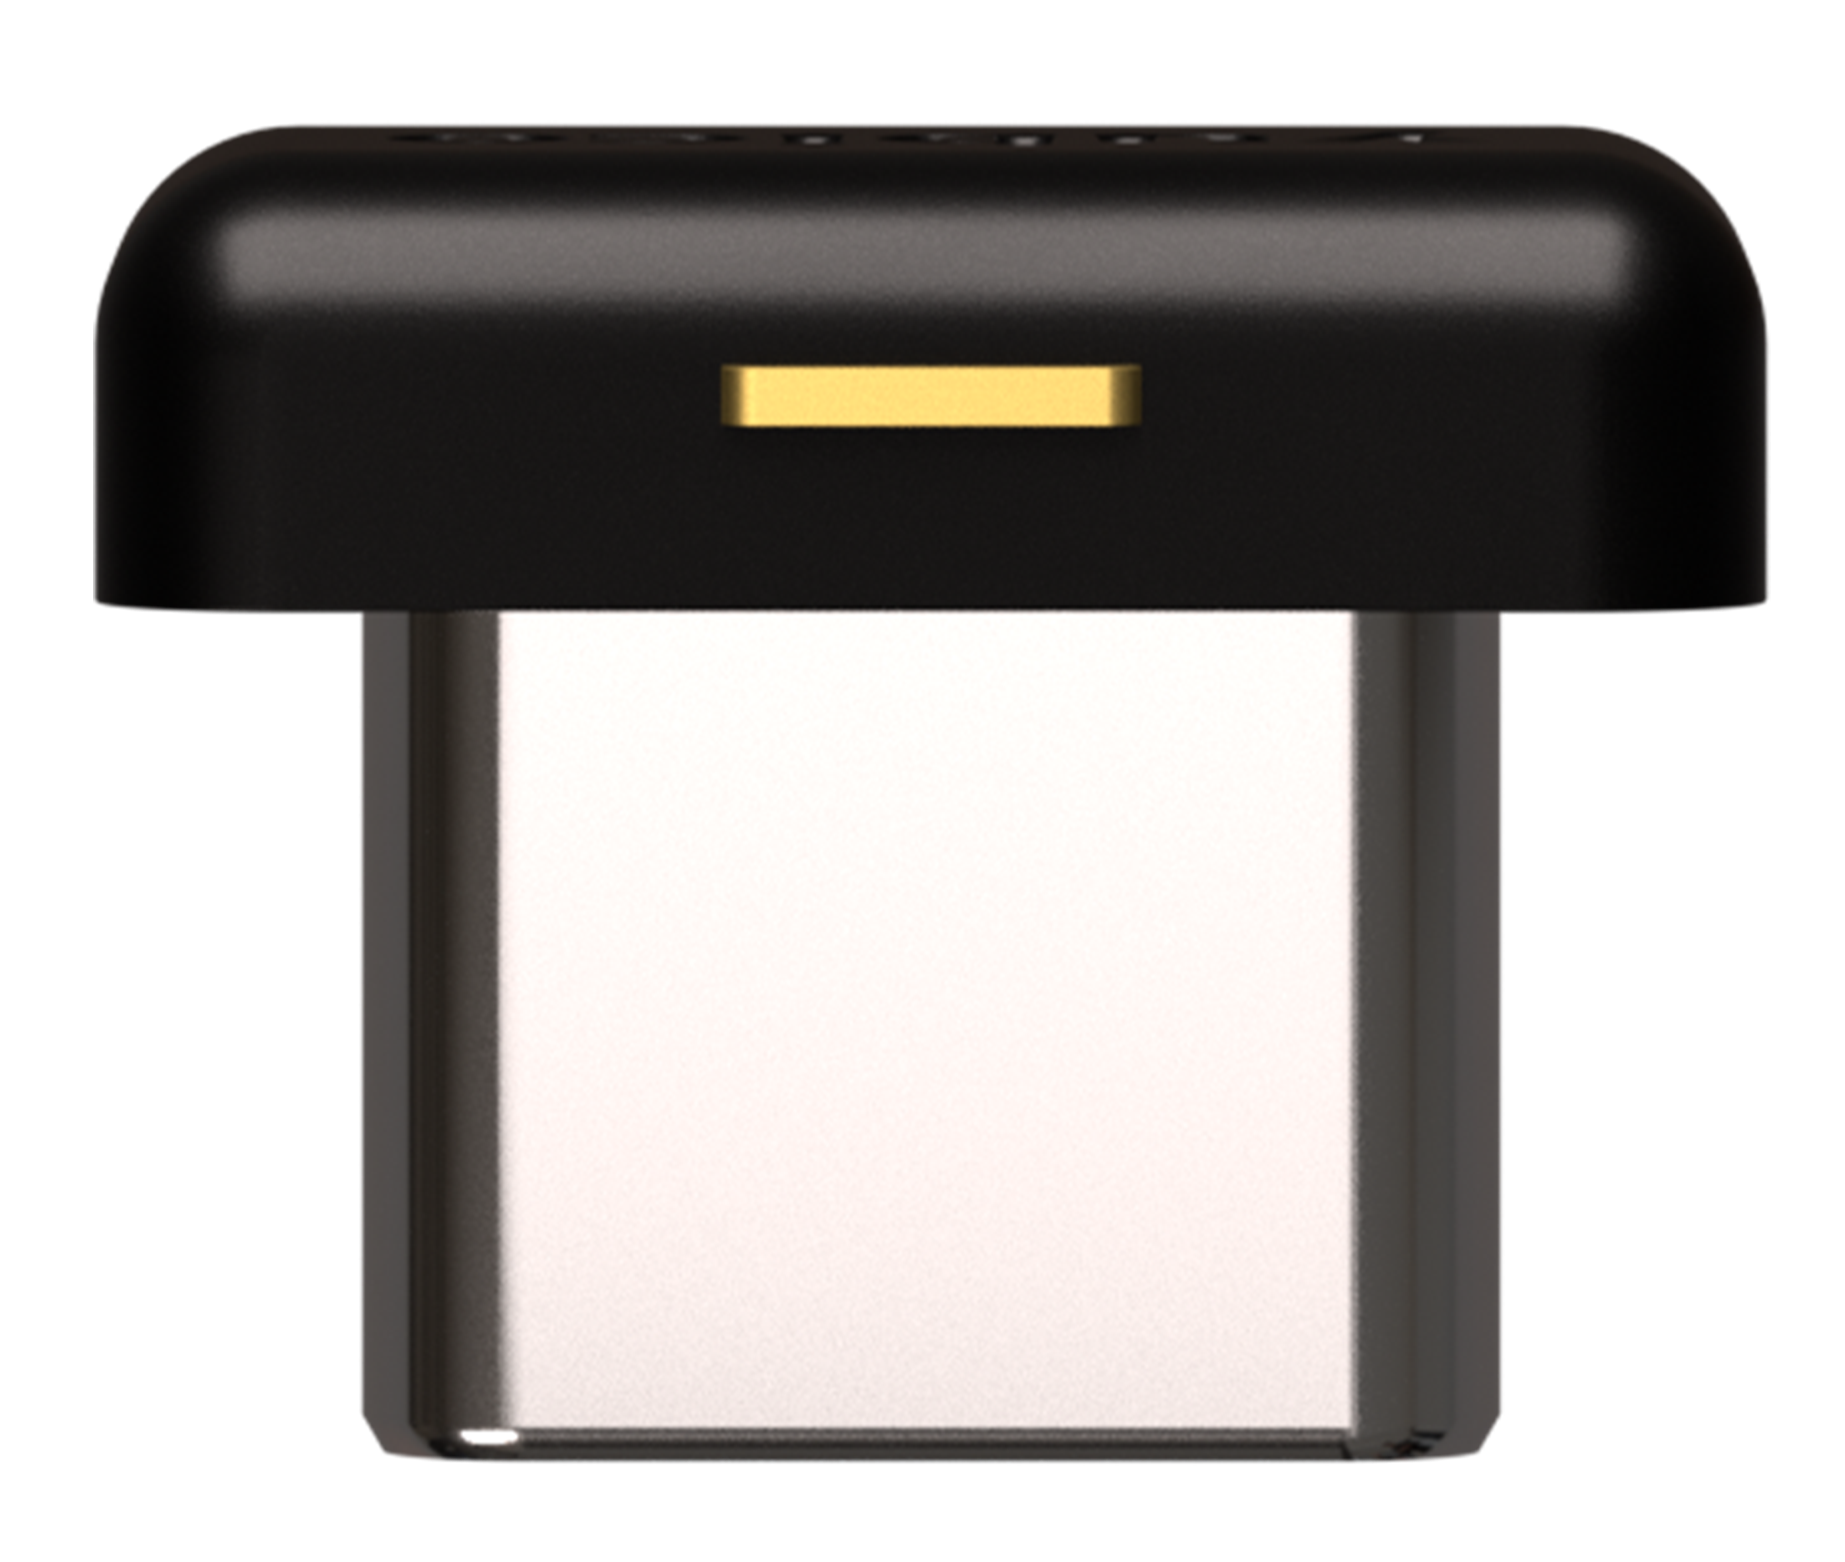
I enabled require touch in my 2026 setup in part because I use AI Coding Assistants, which all overeagerly offer to write commits for me. I always decline. But this is another guard rail so that no code gets pushed to production on my behalf as me without my explicit intent.
Other features to consider
- Setting up a 2nd YubiKey as a backup - and to use interchangeably. See full guide - parts 3 & 4.
- Enabling Key Derivation Function (KDF) to hash PINs across USB bus. Caveat: you will need to wipe your YubiKey gpg applet first if you've already set it up. See full guide - step 6a.
- Configure and encrypt
.netrcfor ssh, ftp, and http based authentication, incl. to GitHub.com. See full guide - step 11. - Use as Passkey for web or SSH auth
In my next article, I'll share more about how I used AI to generate this guide. I thought it would be faster to produce. But it wasn't. My results align with the results of the 2025 METR study on developer productivity when using AI coding assistants - developers thought they were ~25% faster with AI, but were actually closer to ~19% slower with AI.
Slower sounds bad. But it might not be. I'll share why in next article.
Footnotes
- The EUCLEAK discovered in 2024 by NinjaLab showed it was possible to extract the ECDSA secret key with physical access from YubiKeys with firmware prior to version 5.7.0. ↩ ↩2
- Technically GitHub.com offers audit trail logs of last 7 days for git events, but only via REST API, which requires an enterprise license ↩