Terraform on Azure Pipelines Best Practices
On this page
Azure Pipelines and Terraform make it easy to get started deploying infrastructure from templates. But how do you go from sample code to real life implementation, integrating git workflows with deployments and scaling across across multiple teams? Here are 5 Best Practices to get you started on the right foot.
As an engineer in the Azure Customer Experience (CXP) organization, I advise customers with best practice guidance and technical deep dives for specific use cases. This article is based both on recurring themes with customers as well as my previous role as an Enterprise Architect at Allianz Germany when we started our cloud migration in 2016.
Five Best Practices
- Use YAML Pipelines, not UI
- Use the Command Line, not YAML Tasks
- Use Terraform Partial Configuration
- Authenticate with Service Principal Credentials stored in Azure Key Vault
- Create a Custom Role for Terraform
TL;DR; Watch this 5 minute summary instead:
Privacy Notice - if you play the embedded video, you acknowledge and agree to cookies set by YouTube.com
Tip #1 - Use YAML Pipelines, not UI
The Azure DevOps service has its roots in Visual Studio Team Foundation Server and as such it carries legacy features, including Classic Pipelines. If you're creating new pipelines, do not start with classic pipelines. If you have classic pipelines, plan on migrating them to YAML. Industry best practice is to author Pipelines as Code and in Azure Pipelines, that means YAML Pipelines.
If you use Classic Pipelines, do not panic. They will be around for a while. But as you can see from public features timeline and public road map, Microsoft is investing more in YAML pipelines. To be more future proof, choose YAML pipelines.
Tip #2 - Use the Command Line, not YAML Tasks
I have a love hate relationship with Pipeline Tasks. As an abstraction it lowers the barrier to entry. They make tasks platform independent (Windows vs Linux)and pass return codes so you don't have to handle stderr and stdout by hand. See Source Repo on GitHub for other advantages.
But as the README itself says:
If you need custom functionality in your build/release, it is usually simpler to use the existing script running tasks such as the PowerShell or Bash tasks.
And indeed, I find it simpler to use plain old CLI commands in Bash. Over time, as you iterate and create tailored pipelines beyond the "Hello World" examples, you may also find that tasks becomes yet another layer to debug. For example, I used the AzCopy task only to have to wait a few minutes for the pipeline fail because it's Windows only.
Iterate Faster
If I use the command line, I can figure out exactly which -var and other options I need to pass to terraform to achieve the results I want from my local machine without having to wait minutes for each pipeline job to run to know if it worked or not. Once I am confident in my CLI commands, I can put those in my YAML pipeline.
Master the Technology not a Task
In general I recommend every engineer learn how to use a technology from the command line. Do not learn how to use the git extension in your code editor. If you learn something on the command line, be it git or terraform, you learn how it works. Debugging will be far less frustrating as you can skip an abstraction layer (the YAML task) that does not necessarily make your life easier.
For example, I prefer to skip this verbose format found in this example from the Azure documentation
# Verbose 😑
- task: charleszipp.azure-pipelines-tasks-terraform.azure-pipelines-tasks-terraform-cli.TerraformCLI@0
  displayName: 'Run terraform plan'
  inputs:
    command: plan
    workingDirectory: $(terraformWorkingDirectory)
    environmentServiceName: $(serviceConnection)
    commandOptions: -var location=$(azureLocation)
You can do the same using Bash and just pass the flags, e.g. -var or -out as is.
# Less noise 👌
- bash: terraform plan -out deployment.tfplan
  displayName: Terraform Plan (ignores drift)
Because I do not use tasks, I never need to look up in more documentation what environmentServiceName and other attributes do and expect. I only ever need to know Terraform, which lets me focus on my code instead of debugging a dependency - even if it's provided by Microsoft.
Do not install Terraform - keep up with "latest"
There are many Azure Pipeline samples out there with "installer" tasks, including official examples. While dependency versioning is important, I find Terraform to be one of the more stable technologies that rarely have breaking changes. Before you lock yourself down to a version, consider always running with the latest version. In generally it's easier to make incremental changes and fixes than to have giant refactors later that block feature development.
You can see which version is installed on the Microsoft hosted build agents on GitHub, e.g. Ubuntu 18.04. Note these build agents are used both by Azure Pipelines and GitHub Actions.
CLI is vendor agnostic
This preference for CLI mastery over YAML tasks is not Terraform specific. If you browse through my various demos on GitHub, I usually prefer Docker and Node.js on the command line over the equivalent YAML tasks.
The industry is fast-paced. Using the CLI also makes your migration path to new vendors easier. If in the future, when GitHub Actions have matured and you want to migrate from Azure Pipelines, you would not need to migrate the YAML task abstraction layer. Use the CLI and make your future life easier.
But Then How do I Authenticate to Azure?
That is a common question I get from customers. Keep reading. This is in the last section of this article which also discusses secret management in pipelines.
Tip #3 - Use Terraform Partial Configuration
This topic deserves its own article. But I will mention the most important points. You will need a state file when collaborating with other engineers or deploying from a headless build agent.
Start with Local State
If you don't know how your infrastructure should look, experiment locally i.e. don't use a remote backend to avoid CI/CD wait time of minutes.
As you try things out, you will probably break things. At this phase instead of trying to fix it, I will just tear everything down do a rm -rf .terraform and start over.
Once your infrastructure architecture is stable, proceed to create a remote state file.
Create a Storage Account for your State File
Terraform needs an Azure Blob Storage account. ProTip - create the Storage Account by hand using the Azure CLI:
$ az storage account create \
  --name mystorageaccountname \
  --resource-group myresourcegroupname \
  --kind StorageV2 \
  --sku Standard_LRS \
  --https-only true \
  --allow-blob-public-access false
Because Terraform state files store everything including secrets in clear text, take extra precaution in securing it. Confirm that you have disabled public blob access.
Please do not rely on a pipeline task to create the account for you! There is a task that does this, but the storage account is configured to allow public access to blob files by default. The individual state files themselves are secured. But the defaults are not secure, which is a security risk waiting to happen.
Do not use Default Configuration
When using a remote backend, you need to tell Terraform where the state file is. Examples Configuration from the official documentation look like this:
# Don't do this
terraform {
  backend "azurerm" {
    resource_group_name  = "StorageAccount-ResourceGroup"
    storage_account_name = "abcd1234"
    container_name       = "tfstate"
    key                  = "prod.terraform.tfstate"

    # Definitely don't do this!
    access_key           = "…"
  }
}
Use Partial Configuration
Further in the documentation Terraform recommends moving out those properties and using Partial Configuration:
# This is better
terraform {
  backend "azurerm" {
  }
}
Create and Ignore the Backend Configuration File
Instead of using Azure Storage Account Access Keys, I use short-lived Shared Access Signature (SAS) Tokens. So I create a local azure.conf file that looks like this:
# azure.conf, must be in .gitignore
storage_account_name="azurestorageaccountname"
container_name="storagecontainername"
key="project.tfstate"
sas_token="?sv=2019-12-12…"
Triple check that your azure.conf is added to the .gitignore file so that it is not checked into your code repository.
It's OK to use a File in Local Development
On my local machine, I initialize Terraform by passing whole configuration file.
$ terraform init -backend-config=azure.conf
Side note: one of the reasons I use SAS tokens is that I usually only need to work with the remote state file in a project's initial phase. Instead of leaving an access key lying around, I have a an expired SAS token on my local machine.
Your configuration should NOT be a .tfvars File
Variables in with a .tfvars extension are automatically loaded, which is an accident waiting to happen. This is how people unintentionally check credentials into git. Don't be that person or company. Add a little bit of friction and use the -backend-config=azure.conf CLI option.
You can also give the file a .hcl extension for your editor to do syntax highlighting. I use .conf as a convention to signal a warning that this file may contain sensitive information and should be protected.
Use Key Value Pairs in CI/CD Builds
Personally I do not use Secure Files in Azure Pipelines because I don't want to have my credentials in yet another place I have to find and debug. To solve the first problem, I use Key Vault (keep reading).
To solve the second problem I pass the configuration as individual variables to the terraform init command:
$ terraform init \
  -backend-config="storage_account_name=$TF_STATE_BLOB_ACCOUNT_NAME" \
  -backend-config="container_name=$TF_STATE_BLOB_CONTAINER_NAME" \
  -backend-config="key=$TF_STATE_BLOB_FILE" \
  -backend-config="sas_token=$TF_STATE_BLOB_SAS_TOKEN"
If you are not using SAS Tokens, you can pass the Storage Account Access Key with -backend-config="access_key=…"
By using key value pairs, I am being explicit, forcing myself to do sanity checks at every step and increasing traceability. Your future self will thank you. Note also that my variables are named with the TF_ prefix to help with debugging.
So the complete step in YAML looks like this
# Load secrets from Key Vault
variables:
  - group: e2e-gov-demo-kv

# Initialize with explicitly mapped secrets
steps:
- bash: |
    terraform init \
      -backend-config="storage_account_name=$TF_STATE_BLOB_ACCOUNT_NAME" \
      -backend-config="container_name=$TF_STATE_BLOB_CONTAINER_NAME" \
      -backend-config="key=$TF_STATE_BLOB_FILE" \
      -backend-config="sas_token=$TF_STATE_BLOB_SAS_TOKEN"
  displayName: Terraform Init
  env:
    TF_STATE_BLOB_ACCOUNT_NAME:   $(kv-tf-state-blob-account)
    TF_STATE_BLOB_CONTAINER_NAME: $(kv-tf-state-blob-container)
    TF_STATE_BLOB_FILE:           $(kv-tf-state-blob-file)
    TF_STATE_BLOB_SAS_TOKEN:      $(kv-tf-state-sas-token)
Continue reading to learn how the Key Vault integration works. We will also use this strategy to authenticate to Azure to manage our infrastructure.
Tip #4 - Authenticate with Service Principal Credentials stored in Azure Key Vault
We often celebrate when we finally have something working on our local machine. Unfortunately it may be too soon to party. Moving those same steps to automation pipelines requires more effort that conceptually is sometimes difficult to understand.
Why does az login not work in CI/CD?
In short, it does not work because a build agent is headless. It is not a human. It cannot interact with Terraform (or Azure for that matter) in an interactive way. Some customers try to authenticate via the CLI and ask me how to get the headless agent past Multi-factor Authentication (MFA) that their organization has in place. That is exactly why we will not use the Azure CLI to login. As the Terraform Documentation explains
We recommend using either a Service Principal or Managed Service Identity when running Terraform non-interactively (such as when running Terraform in a CI server) - and authenticating using the Azure CLI when running Terraform locally.
So we will authenticate to the Azure Resource Manager API by setting our service principal's client secret as environment variables:
- bash: terraform apply -auto-approve deployment.tfplan
  displayName: Terraform Apply
  env:
    ARM_SUBSCRIPTION_ID: $(kv-arm-subscription-id)
    ARM_CLIENT_ID:       $(kv-arm-client-id)
    ARM_CLIENT_SECRET:   $(kv-arm-client-secret)
    ARM_TENANT_ID:       $(kv-arm-tenant-id)
The names of the environment variables, e.g. ARM_CLIENT_ID are found in this Terraform Documentation. Some of you might be thinking, are environment variables secure? Yes. By the way the official Azure CLI Task is doing the same thing if you examine line 43 in the task source code.
To be clear we authenticate headless build agents by setting client IDs and secrets as environment variables, which is common practice. The best practice part involves securing these secrets.
Double Check You are Using Pipeline Secrets
In Azure Pipelines having credentials in your environment however is only secure if you mark your pipeline variables as secrets, which ensures:
- The variable is encrypted at rest
- Azure Pipelines will mask values with
***(on a best effort basis).
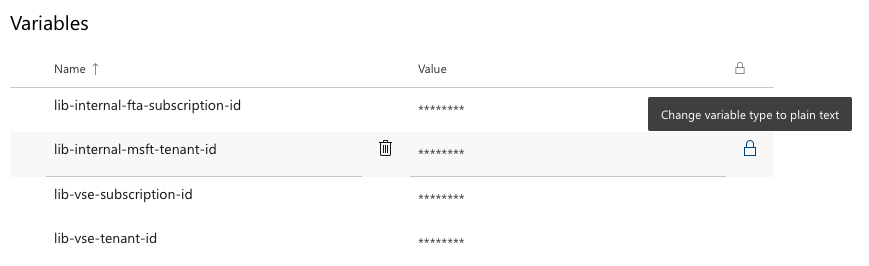
If you switch to plain text, the secret does not appear. Instead you need to reset it.
The caveat to using secrets is that you have to explicitly map every secret to an environment variable, at every pipeline step. It may be tedious, but it is intentional and makes the security implications clear. It is also like performing a small security review every time you deploy. These reviews have the same purpose as the checklists that have been scientifically shown to save lives. Be explicit to be secure.
Go Further - Key Vault Integration
Ensuring you are using Pipeline Secrets may be good enough. If you want to go a step further, I recommend integrating Key Vault via secret variables - not a YAML task.
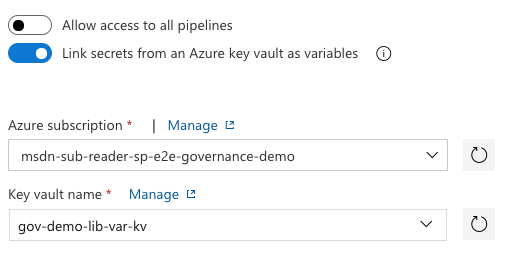
Note "Azure subscription" here refers to a service connection. I use the name msdn-sub-reader-sp-e2e-governance-demo to indicate that the service principal under the hood only has read-only access to my Azure Resources.
These are reasons large companies and enterprises may choose this route:
- Re-use secrets across Azure DevOps projects and Azure DevOps organizations. You can only share Service Connections across projects.
- Stronger security with Azure Key Vault. Together with the proper service principal permissions and Key Vault access policy, it becomes impossible to change or delete a secret from Azure DevOps.
- Scalable secret rotation. I prefer short-lived tokens over long-lived credentials. Because Azure Pipelines fetches secrets at start of build run-time, they are always up to date. If I regularly rotate credentials, I only need to change them in 1 place: Key Vault.
- Reduced attack surface. If I put the credential in Key Vault, the client secret to my service principal is stored only in 2 places: A) Azure Active Directory where it lives and B) Azure Key Vault.
If I use a Service Connection, I have increased my attack surface to 3 locations. Putting on my former Enterprise Architect hat… I trust Azure DevOps as a managed service to guard my secrets. However, as an organization we can accidentally compromise them when someone (mis)configures the permissions.
ProTip
The variables above are all prefixed with kv- which is a naming convention I use to indicate those values are stored in Key Vault.
Tip #5 Create a Custom Role for Terraform
Security and RBAC best practice is to grant only as much access as necessary to minimize risk. So which Azure role do we assign the Service Principal used by Terraform? Owner or Contributor?
Neither. Because we are deploying infrastructure, we will probably also need to set permissions, for example create a Key Vault Access Policy, which requires elevated permissions. To see which permissions Contributors lack we can run this Azure CLI command:
az role definition list \
  --name "Contributor" \
  --output json \
  --query '[].{actions:permissions[0].actions, notActions:permissions[0].notActions}'
which will output the following:
[
  {
    "actions": [
      "*"
    ],
    "notActions": [
      "Microsoft.Authorization/*/Delete",
      "Microsoft.Authorization/*/Write",
      "Microsoft.Authorization/elevateAccess/Action",
      "Microsoft.Blueprint/blueprintAssignments/write",
      "Microsoft.Blueprint/blueprintAssignments/delete"
    ]
  }
]
To create a Key Vault Access Policy, our service principal will need "Microsoft.Authorization/*/Write" permissions. The easiest solution is to give the service principal the Owner role. But this is the equivalent of God mode.
Consequences of Delete
There are fine but important differences not just for large enterprises but also compliant industries. So if you're a small Fintech startup, this applies to you too. Some data cannot be deleted by law, e.g. financial data needed for tax audits. Because of the severity and legal consequences of losing such data, it is a common cloud practice to apply management locks on a resource to prevent it from being deleted.
We still want Terraform to create and manage our infrastructure, so we grant it Write permissions. But we will not grant the Delete permissions because:
- Automation is powerful. And with great power comes great responsibility, which we don't want to grant a headless (and therefore brainless) build agent.
- It's important to understand that git (even with signed commits) gives technical traceability, but in your organization that might not satisfy requirements for legal audit-ability.
So even if you have secured your workflow with Pull Requests and protected branches, it may not be enough. Therefore, we will move the Delete action from the git layer to the cloud management layer, i.e. Azure for audit-ability, using management locks.
So create a custom role and make sure you have the following notActions:
{
  "notActions": [
    "Microsoft.Authorization/*/Delete"
  ]
}
The code does not specify Azure Blueprints. Use the same reasoning above to determine if in your use case, you need access and when to restrict it.
Summary
In this long guide we covered a few general Azure Pipeline Best Practices to use Pipelines as Code (YAML) and to use the command line, which helps you master Terraform and any other technology. We also walked through how to properly secure you state file and authenticate with Azure, covering common gotchas. Finally the last two topics of Key Vault integration and creating a custom role for Terraform.
If there is too much security in this article for you, that's okay. Do not implement every practice at the same time. Practice one at a time. And over time, at least months, security best practices become second nature.
This article focused specifically on Best Practices when using Azure Pipelines. Stay tuned for another article on generic best practices, where I explain how to use git workflows and manage infrastructure across environments.